MEDIA COORDINATOR HANDBOOK
Auckland Direct
CONTENTS
Media Coordinator Overview
Who to Contact
Useful Links
Bookmarks/links for new starters
Useful websites
Radio
Products
Superzones
Local Reach Packs
Adlets
Time Saver Traffic
Live Events
Commercial Integration
Radio Creative and Material
Deadlines
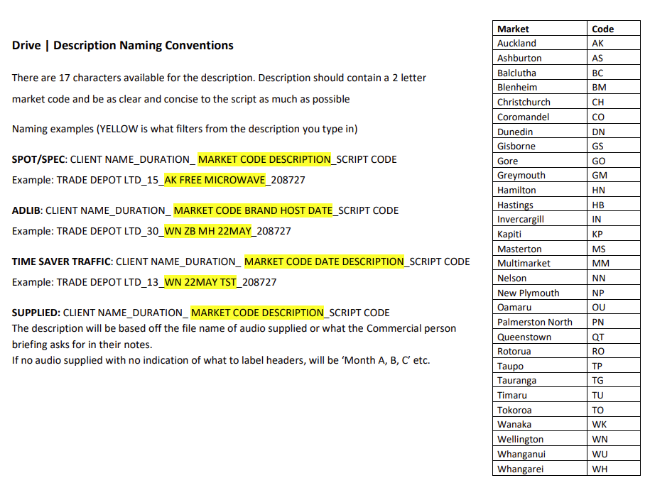
Drive
RAP
SML
Publications and deadlines
Ad archive - tearsheets
SCC pageview
Viewme / paperview
ATOL
Digital
Products
Reporting
General
Proforma invoices
Account credits
Makegoods
Lightning
Media Coordinator Overview
Coordinators support three to five Reps each, looking after their admin and creative after a sale has been made. Below are the basics of how this works:
PRINT:
The process for print is as follows:
1. The Account Manager (AM) will sell an advertisement space in one of our print publications.2. This is booked in by our Media Manager (MM) team. The AM will send the booking request to MM with their Media Coordinator (MC) cc’d and then the system sends an automated email to the AM once it’s been booked. If a Premium Product has been booked, we must check the Premium products log has been updated by MM.
3. The MC emails the client with deadlines and specs when this is booked in and then a follow up a week out from the deadline, then a day out and day of if still not received. This depends on whether the client sends us the material, or we create the material in-house. If the client sends us the material, we load it and the process is complete.
4. If the client is not creating their own material and they need to use NZME ad services, we get a brief from the client and submit the brief in ATOL (Ad Tracker). The MC gets an automated email once the proof is ready for review and sends it to the client as a ‘proof ad’ pdf. They will either 1.) ask for more changes or 2.) approve the ad. We make between 3-5 different changes to a setting ad. This can be very time consuming. Once it is approved, the process is complete.
Specs and Deadlines: Click here
RADIO:
The process of selling radio is as follows:
System:
Radio Planning team: To create proposed schedule
Drive: Booking schedule
Drive: Ad creation
HubSpot: RAP: Ad instruction
2. A MC sends the schedule to Mile to book (radio booking Coord), once booked she sends you the contract number and you can download from Drive and then send the contract back to the AM. If there are avails issues, your Radio Traffic Manager will advise and work with you to move ads to where avails allow.
3. Media Coordinators oversee radio ad creation. There are two different scenarios when it comes to radio creative - the audio is created in-house or the client sends us the audio. Either way we submit a brief in Drive.
4. In-house ad: Submit brief with copy pointers from client for script. Writer is allocated and sends email with a link to the script for approval. MC gets script and sends to client for approval. If script is approved MC approves via email portal and audio is created. Once audio is ready writer sends email to MC and MC exports audio, sends to client and if approved, approves via email portal.
6. The final step is the RAP (registered audio to play) or instructing how the audio needs to play on air. We can see our missing’s lists in Drive via the Uninstructed report. Radio contracts must be ‘RAPd’ by 10am the day prior to the schedule starting (Tues to Fri) for the weekend (Sat to Mon) we must RAP everything by 4pm on a Thursday.
DIGITAL:
System:
Media Manager to book
Digital Dashboard for missing’s
Digital Dispatch for loading creative
Digital Dashboard to check performance
We use the same booking process for digital as we do for print, so the AM will send their booking form through to the Media Manager team and then we get the confirmation. The digital missing’s list can be pulled from our Digital Dashboard in GAM so each Media Coordinator can see what they need material for.
The process for digital is:
1. The AM will send their confirmed booking to Media Manager who will book in the advertisement and the MC will get the confirmation. There are MANY digital products.
2. Media Coordinator sends specs and chases client for creative
3. Often, digital ads are created in house. We brief in digital ad creation the same way as print. Client can also send us creative ready to load along with a URL for the ad to click through to.
4. Once material is approved/received, we send the material to Digital Dispatch, with a URL and instructions, who load the creative and send us previews/screenshots to send to the client.
6. The MCs check the digital missing’s in GAM daily and contact clients to find out what they want to do for the creative – we do this at least a week out from start date.
7. The MCs also check how a digital campaign is performing; we do this at least once per week. When a campaign is under performing, we alert the digital traffic team who then ensures it performs in full.
The Media Coordinator team uses many different systems for numerous different reasons, see below a brief breakdown.
|
System |
Product |
What it does |
Who uses it |
|
Media Manager |
Print and Digital |
Booking print and digital |
Media Manager team |
|
Drive |
Radio |
Booking radio
Briefing radio ads |
Media Coordinators |
|
Digital Dashboard (GAM) |
Digital |
Campaign overview and reporting |
Media Coordinators |
|
Drive |
Radio |
Radio ad creation |
Media Coordinators |
|
ATOL |
Print and Digital |
Print and digital ad creations |
Media Coordinators |
|
HubSpot |
Client database
Radio |
Client database, upload contracts, pipeline RAP – Register Audio to Play |
Media Coordinators |
|
Ad Archive |
|
Print ad archive |
Media Coordinators |
|
Power BI |
Print and radio |
Avails |
Media Coordinators |
Checklist for Training
|
Radio |
|
|
Radio product overview |
|
|
Deadlines |
|
|
How to read a radio schedule |
|
|
Create a contract in Drive for 15s and 30s |
|
|
Create a contract in Drive for TSTs |
|
|
Create a contract in Drive for Premium products |
|
|
Adlets/superzones/headliners |
|
|
Adlibs and phoneouts |
|
|
Key header naming conventions |
|
|
Export a contract |
|
|
Submit a brief in Drive |
|
|
Get audio loaded and ask for keys |
|
|
Script creation |
|
|
Audio creation |
|
|
Export audio |
|
|
Get keys for RAP |
|
|
RAP |
|
|
RAP terrestrial radio |
|
|
RAP TSTs |
|
|
RAP iHeart radio |
|
|
Edit RAPs |
|
|
Avails |
|
|
Check TST avails |
|
|
Live Events |
|
|
Adlets |
|
|
Superzones |
|
|
Adlibs |
|
|
ZB Live Events |
|
|
Music adlibs |
|
|
SML Player |
|
|
Commercial Integration overview |
|
|
Add a charge for talent voicing and how they can get paid |
|
|
|
|
|
|
|
|
Export missing list |
|
|
Export bookings list |
|
|
Upload material |
|
|
Save clients to favourites |
|
|
ATOL |
|
|
Setting |
|
|
Put changes through |
|
|
Pick up |
|
|
Layouts - who to go to and why |
|
|
Pencil and book Premium Positions |
|
|
Challenge for Premium Positions |
|
|
Find specs |
|
|
Find ratecards |
|
|
Different publications |
|
|
Inserts |
|
|
Ad Archive |
|
|
Optima |
|
|
|
|
|
Digital |
|
|
Export missing list |
|
|
Sending creative to Traffic (Digital Dispatch) |
|
|
Pull digital reports |
|
|
Campaign overview |
|
|
Campaign breakdown |
|
|
Device breakdown |
|
|
Creative previews |
|
|
iHeart report |
|
|
IHeart and Triton dashboards |
|
|
Screenshots |
|
|
Find specs |
|
|
Pencil and book Premium Products |
|
|
How to use the Digital Toolbox |
|
|
Screenshots (adwallet) |
|
|
Digital Deck/Products |
|
|
Find digital booking number in MM |
|
|
|
|
|
|
|
|
BriefMe brief |
|
|
Power BI - reports |
|
|
Lightning - overview |
|
|
Commercial Toolbox navigation |
|
|
|
|
|
|
|
|
|
|
|
|
|
Who to contact
|
Shared Mailbox |
Purpose |
|
Media Manager: svc.cdmmmanager@nzme.co.nz |
|
|
Digital Dispatch: digitaldispatch@nzme.co.nz |
|
|
Digital Traffic/Digi Operations: traffic@nzme.co.nz |
|
|
Paid media: digitalservices@nzme.co.nz |
|
|
Radio Traffic: radiotraffic@nzme.co.nz |
|
|
Adlib team: adlib_bookings@nzme.co.nz |
|
|
TST team: tst@nzme.co.nz |
|
|
S&V (Creative Briefs): soundvisioncreative@nzme.co.nz |
|
|
Radio Material: RadioMaterials@nzme.co.nz |
|
|
Sponsored content: CommercialProjects@nzme.co.nz |
|
|
Magazine info: kelly.spice@nzme.co.nz Or katherine.large@nzme.co.nz |
|
|
Ad Support Team (ATOL): Ad-Support@nzme.co.nz |
|
|
DirectMe (Akld Direct Media Co shared inbox): DirectMe@nzme.co.nz |
|
|
HubSpot (Client Database) - crmops@nzme.co.nz |
|
|
They can either be sent to nzme@invoice.gfsnz.co.nz (this is an automated process) or ap.enquiry@nzme.co.nz
|
|
|
Credit Q Team - creditq@nzme.co.nz |
|
|
Credit Applications: creditapp@nzme.co.nz |
|
|
Customer Service: customerservices@nzme.co.nz |
|
|
Commercial Finance: commercial.finance@support.nzme.co.nz |
|
|
Reception: reception@nzme.co.nz
|
|
Other
|
Technology Service Desk Team (IT) - service.desk@nzme.co.nz |
|
Payroll Services: payoffice@nzme.co.nz
|
Bookmarks/links for New Starters
Below are all the links to our systems or sites:
- Directme Inbox - email for all media coordinators
Log in with your NZME email address and NZME password
- Drive - Radio bookings/missing's – confirms, air time reports
Log in with your NZME email address and NZME password on the pop up tab in Chrome.
- If you are having issues with the pop up login tab, make sure your browser settings are not set up to block pop ups!
- Media Manager - print missing's – digital/print bookings Log in will be emailed to you by Megan Pescini
- AdArchive – print tearsheets
- Power BI Favourites (save the below to your Favourites page)
- Digital Dashboard - digital missings and reporting – email Traffic for access
- Digital Bookings Calendar 2024 – you need to email Traffic for access
- iHeart Dashboard – email Traffic for access
- Adtracker Online - AKA ATOL – briefing print/digital - checking progress. Email Carol Kerby if log in isn’t set up on start up
- Adwallet Username: nzme Password: 12345
- ConnectMe – NZME hub
- Affinity - Self Service Leave Requests, HR Details, Information etc
- ViewMe aka Paperview
- Stirlitz Media Logger AKA SML – to get audio clips that have aired
- DriveMe - NZME pool car booking form
- Issuu - NZME publications online
- Commercial Toolbox – for all Sales collateral and product info – endless info
- BriefMe - Where you can submit briefs from clients
Useful Websites
Unsplash.com – If you need generic images for presentations, this is a totally free and great quality stock image site, so you won’t need to worry about watermarks, and you can filter the results to image orientation as needed.
Even thought it’s a free site, it will sometimes try to direct you to premium/paid iStock results – just need to scroll past those to the “Unsplash” results.
Background remover – Removes backgrounds from logos to they can be moved around transparently. Works on nearly all images but it depends on the way the image was created, as to whether it will isolate and remove the background properly.
Percentage calculator – Yes, we all know how to do this stuff on a regular calculator or spreadsheet, but sometimes it’s just easier to use this and have one less thing to actively think about!
URL Builder – Used to create UTM codes
https://ga-dev-tools.google/campaign-url-builder/
CPM Calculator
https://www.clickz.com/static/cpm-calculator
RADIO PRODUCTS
Superzones
Superzone packs are a National radio product, selling pre-planned spot laydowns across (nearly) all NZME brands in all regions, across the space of one week. 147 stations, premium placed spot-fall.
How to book a Superzone
https://connectme.nzme.co.nz/commercial/how-do-we-sell-it/drive
RAP
https://lightningcrm.lightning.force.com/lightning/o/RAP__c/list?filterName=Recent
Local Reach Packs
Local Reach packs are:
Bulk 15 second ad buy
Available in Hawke’s Bay, Nelson, Northland, Taranaki, Dunedin, Rotorua, Manawatu and Southland across all the brands available in that region.
Timezone of 6a-7p
Cost: $200.00 per module/week, per region.
How to book a Local Reach Pack
1. Select New Contact in Drive Contracts and enter the client name.
2. Fill out the Header Details as appropriate for the client otherwise enter the Advertising Campaign field as LOCAL REACH if it is casual, or as the current Partner Programme code if it’s a PP client and load the commitment.
If the Local Reach pack is part of a larger casual schedule that includes other radio activity, just enter the campaign as CASUAL and make a note in the Internal notes it includes Local Reach.
3. Find the region’s Local Reach collateral here so you have a reference point for the brands that are included in the pack.
4. In the Spot Laydown tab, build your lines. We need two different spot lines – one line for Newstalk ZB only, and one Combo line for the other stations – both set up as ZONED 6a-7p with a 15” duration.
IE for a Southland Pack, set up one line as below:
Branch: Dunedin
Brand: Newstalk ZB
Timezone: ZONED (0600 – 1900)
Duration: 00:15
Placement: Any
Spot Rate: $4.00
Then set up one Combo line for the other stations as below:
Branch: Dunedin
Brand: as per the collateral – in this case Coast, Gold AM, Hauraki, The Hits, ZM
Line Per Station unticked in Station Builder
Timezone: ZONED (0600 – 1900)
Duration: 00:15
Placement: Any
Spot Rate: $3.00
5. When your lines are set up, place 1 Combo spot per weekday (5 total) in the music brand line, and 2 spots per weekday (10 total) in the ZB line. It should add up to $200.00 total for one module:

6. Once your laydown and spots are correct, continue the standard process of making the contract live, sending confirmation to Traffic to approve the oversell and rates, and send a contract confirm to the AM.
LOCAL REACH FAQ
- Can I enter multiples modules on the same contract?
Yes. An AM may sell 4 weeks of modules consecutively, or maybe 2 x modules for the same region and week, for increased reach and frequency – you’d just double the amount of spots on the lines.
The pack is designed to be a “builder” pack – so they can sell multiple modules if needed, whether that is in different regions or the same region but different weeks, OR multiple modules in the same week.
As long as it’s adding up correctly – ie 4 modules has a total price of $800.00, it’s all good.
- What if the client only has 30” audio?
The price and reach has been designed around 15” duration so this is not the intention. However, if it has to be 30”, we can use standard conversion to increase the spot price. This is grossing up the 15” spot rate by 30%. It will make the overall pack total 30% more, and this can only be accommodated if the avails allow.
IE the 15” spot rate is $4.00 for ZB – It would be $5.72 for a 30” spot, and a $32.00 15” Combo rate for music brands would be $45.72
RAP
https://lightningcrm.lightning.force.com/lightning/o/RAP__c/list?filterName=Recent
Adlets
Adlets are 10-second radio ads. They are sold in weekly modules across network brands, they are only ever Network, not individual regions, and there are separate avails for them (due to them not contributing to the standard ad log).
When Adlets packs are sold, the AM just needs to let their co-ord know the following details so we can book it in:
- Client/account
- Week commencing date
- Which brand/s
- Module price (there is a standard price but these can often be discounted further)
If you want further information on how adlets are set up, refer to the collateral here.
How to book Adlets
https://connectme.nzme.co.nz/commercial/how-do-we-sell-it/drive
RAP
https://lightningcrm.lightning.force.com/lightning/o/RAP__c/list?filterName=Recent
Time Saver Traffic (TST)
Time Saver Traffic is a credit module, spoken live by announcers before delivering live traffic report. We sell them in weekly modules per region, across all brands in that region. The credits are 8-10 words before the report, and then a 15-word credit at the end of the report.
Because they’re spoken live and not recorded, we can’t pull a usual Aired Times report, and it has a slightly different materials and RAP process.
If you want further information on TST, refer to the collateral here. The standard booking and scripts/RAP deadline is 2pm Thursday, for the following week.
How to book a TST
https://connectme.nzme.co.nz/commercial/how-do-we-sell-it/drive
Briefing TST Creative
Briefing for TSTs is a little different, because we don’t go through the process of supplying, or recording and DLET
approving audio. With the credits spoken live by announcers, we are just getting key headers and scripts organized so we can RAP.
1. In Drive, find your Customer, and under Brief, select the Compose button.
2. In scope select Time Saver Traffic. If you don’t submit the TST brief, the Sound & Vision team will not be able to create the correct key headers for you.
3. Fill out the fields as normally needed and copy and paste your script into the Assigment field. When a client has supplied the script, be sure to check that it fits script word count of 10 words for intro, and 15 words for outro. (Remember URLs particles like “dot” or “backslash” will count as a word).
4. Hit Ok to submit
RAP
https://lightningcrm.lightning.force.com/lightning/o/RAP__c/list?filterName=Recent
Live Events (Adlibs and Phone Outs)
Live Events are when our announcers/talent endorse and speak about our client’s product, brand or service on air, connecting the announcer with the client directly. Adlibs are a script read out by the announcer, whereas a Phone Out is when the client converses back and forth with the client themselves to generate the content. This is one of our most premium radio products and availability can be hard to secure depending on who the talent is, and when it is.
The product and processes for live events are different depending on if they are Newstalk ZB, or one of our music brands, and depending on local shows or network etc.
ZB = ADLIBTALK (60 ses) 8.20am is National
Other stations: ADLIBMUSIC (30 secs)
How to book an adlib:
https://connectme.nzme.co.nz/commercial/how-do-we-sell-it/drive
Full process for Music adlibs
Full process for Live adlibs
Live Adlibs and Phoneouts Process Training
Commercial Integration
Promotional activities via the radio stations.
- The Account Manager will submit a brief via Brief Me and the CI team will then work on proposals to suit
- AM presents proposal to client, if client wants to go ahead with the campaign, then the AM lets the CI team know
- Once the activity has been approved the CI team sends a booking form to the AM to be booked in Drive (and if social posts/activity Media Manager too).
- Once this is booked, send contracts/IO back to CI contact
- The CI team then send a client requirement form which is for the client to complete
- Client then sends completed form back along with images required if social/digital booked
- CI team get scripts and copy written, then sent back to client for approval
- If there are promercials or music adlibs booked, the AM/MC need to:
- Promercials: Akld – RAP keys
- Promercials: Regions – brief promercial script and get it recorded, send for approval and RAP
- Music adlib: brief, get approval and RAP
- Try to work in with the CI team, so send these together in the client requirements document
- Send audio for the clients ‘files’ only not for approval as such
- The CI team does a PCA at the end of the campaign
RADIO
CREATIVE & MATERIALS
DEADLINES
DRIVE
RAP
SML
Deadlines:
Once we have booked the radio schedule into Drive, we need to organize audio to play, or scripts depending on what is booked.
Adlets, 15 and 30 second audio:
Submit a brief with copy pointers or script: 4 days from start date
Submit audio and ask for key headers: 2 days from start date
RAP: 10am day prior for Tuesday, Wednesday, Thursday, Friday
RAP: for the weekend and Monday must be done by 4pm on Thursday unless communicated and agreed upon by Radio Materials
Time Saver Traffic: Script/copy pointers must be submitted by Thursday 5pm for the next week
ZB adlibs and phoneouts and Music adlibs:
- All Newstalk ZB live events and phones outs must have scripts emailed to adlib_bookings@nzme.co.nz by 12pm the business day prior to broadcast
- For all Music Brand Adlibs, these must be emailed to adlib_bookings@nzme.co.nz with a key header 4 days prior to ad running by 12pm four business days prior to broadcast
Some important reminders:
- Ensure you are checking avails for availability – they can be found here
- Please ensure you are following the correct script process – the forms and script templates can be found here
- If you need assistance after hours, please call 0800 876 000 (subject to a call out fee)
- If you are unable to adhere to the deadlines, your adlib spot and revenue will be deleted by 12.30pm
Any issues email Kylie Gray – kylie.gray@nzme.co.nz
RAP (Register of Audio to Play)
RAP is the system NZME currently uses to record the intended audio instructions for each Drive contract; the Sales side will enter the RAP by the appropriate deadline, and the Radio Materials action the RAP by instructing the contract in Drive to air the audio as RAPPED.
Link to RAP
https://app.hubspot.com/contacts/45535760/objects/2-32496778/views/41251143/list
Important things to note about RAP:
- Each contract should only ever have one RAP; revisions and additions should always be an edit to the existing RAP. Otherwise, the Material team do not have one source of truth of what should be aired on the contract.
- Start and End dates always refer to the start and end of the applicable instructions in the RAP. If you extend a RAP, you should adjust the Start to reflect the new period of time you are asking them to instruct.
If you don’t put the correct Start date of when the instructions are applicable, it means the Materials team cannot prioritise the more urgent instructions.
- Always have the Drive contract you are RAPPING open while you enter or revise your RAP
- Always copy and paste info wherever possible, like contract numbers and client names but especially key headers. It keeps it consistent and less risk of error!
- You need key header/number to RAP
SML / iMedia Logger / Audio Snips
If you need to listen to or extract audio from past radio transmission – iMedia Logger gives us access (in varying formats) to find, listen and snip what we need. This includes most NZME brands, and some limited access to non-NZME stations ( varying formats and quality). We usually just refer to it as SML although various services are used.
Remember to shut down SML tabs once you are finished with it – only a certain amount of accesses work at one time, so don’t stay connected if you aren’t actively using it. SML usually only stores up to 2 months of previous audio.
Link to ConnectMe with all Loggers
https://connectme.nzme.co.nz/get-it-done/technology/broadcasting-transmission/radio-loggers
Finding Audio
1. Open iMedia Logger/SML on a Chrome browser
2. Starting with the region, hover over each area on the map and select the server you want to search.
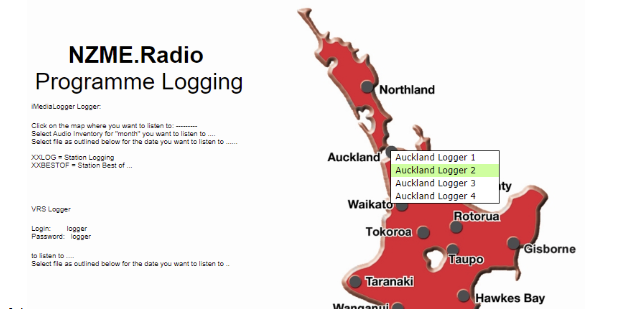
- If you don’t know which one you need, just check each one until you find it
- Generally, Auckland Logger 2 will have AKL NZME stations on SML
- Sometimes a brand will sit in a nearby region, ie some Kapiti frequencies are located in Wellington
- Audio not in SML can’t be extracted in the same way – it’s more like hour-long bites of audio stored that you can download. You can just locate this via the folders named with dates and times.
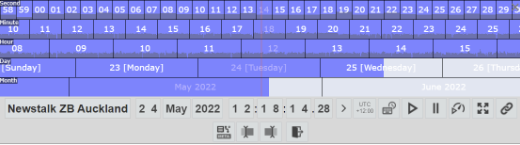
3. If the station you’re searching is in SML, you have two choices to locate your audio:
- manually dragging the timelines to sit in the correct spot across the red line in the middle.
- Clicking with either your mouse’ left-click to increase, or right-click to decrease, the numbers on the gray bar for dates and times.
Snipping and Exporting Audio From SML
2. Locate your audio in SML
- If it’s a standard commercial that has an aired time logged against it, refer to the aired times report for a more accurate timestamp.
- If it’s an adlib, TST or other radio product that is live read, you may need to go to the general time and just listen to the audio a few minutes either side of it’s scheduled time. It’s faster if you listen and left-click on the 10-second number to listen out for it in 10-second increments.
3. Mark out the end of your audio snip with the
4. To export your audio – select the
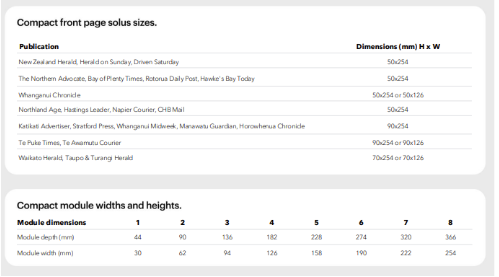
Publications and Deadlines
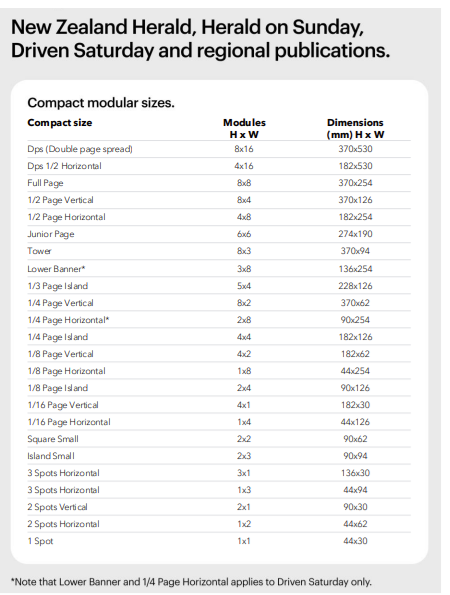
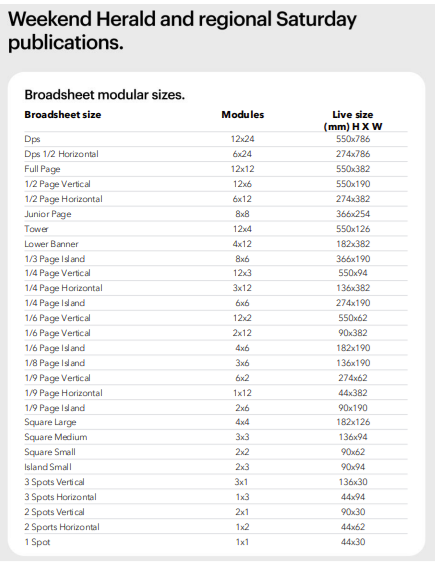
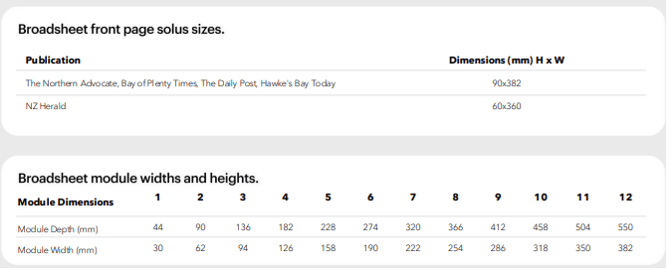
Most papers are 8x8 - compact sizing – except for ones such as Herald Weekend (Sat), they are 12x12 – broadsheet sizing.
- Most common size is 2x8 – ¼ page horizontal.
- NIMs: Newspaper inserted magazine – e.g. Viva, Canvas, Reset, Travel
- Paperview – Digital version of magazine.
- Pageview – PDFs
New Zealand Herald Publications:
- New Zealand Herald - NZH (Monday to Friday): Compact
- Material deadline: Day before 4pm (Monday booking - deadline is 4pm Friday)
- Weekend Herald (Saturday): Compact
- Material deadline: Friday 4pm
- Herald on Sunday - HOS (Sunday): Broadsheet
- Material deadline: Friday 4pm
- Reset: Compact - Sunday
- Material deadline: Thursday 12pm
- Canvas: Compact - Saturday
- Material deadline: 12pm Thursday
- Travel: Compact – Tuesday and Sunday
- Material deadline: Friday 12pm for Tuesday edition
- Material Deadline: Thursday 12pm for Sunday edition
- Viva: Compact – Wednesday
- Monday 12pm prior
- Driven: Compact – Saturday
- 3pm Wednesday
Regional Products:
Compact: Monday to Friday
- The regional dallies are 3pm day prior
- Northland Age - 2pm day prior
- Weekend Sun - Thursday 11am (day prior)
- Waikato Herald - 12pm day prior
- Katikati News and Te Puke News (Friday publications now) Wednesday 12pm
Broadsheet: Saturday
- Bay of Plenty Times
- Hawkes Bay Today
- The Northern Advocate
- Rotorua Daily Post
- Whanganui Chronicle
Deadline for all is Friday midday day before
Specs and Deadlines Document: Click here
Sizing and Specifications (Specs)
Media Manager
Media Manager is the system that our print and digital is booked and billed from. Unlike radio, co-ords don’t physically input the booking into the Media Manager system ourselves. When a print insertion or campaign is sold by the AM, it’s standard practice for them to email the booking straight to the Media Manager team, who input it to the Media Manager system, though co-ordinators can facilitate this with the MM team on behalf of an AM.
Navigating Media Manager (Print)
Media Manager is pretty straight forward in what you can see and do. For co-ords, we should only view bookings and upload material – any other actions should be going through the Media Manager team.
The begin, the Material tab is purely to show what has been booked that needs material to be supplied to it. The Bookings tab is a more comprehensive way to look at all bookings, regardless of what stage the material is at. You can also use the Search tab in the top left – ie search for a client record or booking number.
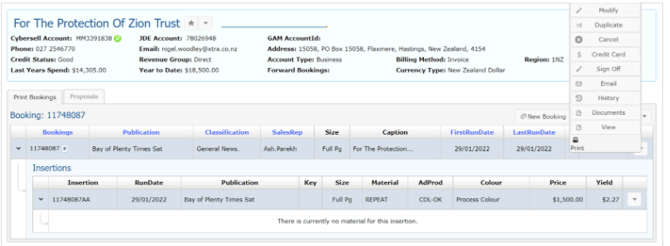
At any view, navigating is simple – either by expanding the information views via arrows on the left, or using the Options tab via the arrows on the right.
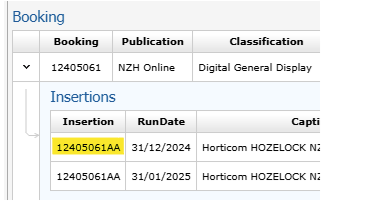
All bookings have a 7-number reference booking number, and then the individual ads (“insertions”) in that booking are differentiated with letters after the numbers. The Size column refers to the insertion’s ad size by the name of the standard size – if you hover over it, it’ll tell you what shape is it by module (HxW), not the dimensions by measurement (like centimeters). For more information on that, see Specs and deadlines
The Run Date is the issue date of the publication – not the day it all goes to the printers.
The Material column refers to how the creative is intended to be supplied – Setting (material to be created in house) or Camera Ready (supplied to NZME as is). The Media Manager team will default a booking to Camera Ready status unless the person who books it tells them otherwise.
If Camera Ready has a little blue triangle next to it, that means material has been uploaded against the insertion via the Media Manager site upload.
Bookings showing up in orange mean it’s been put on hold by accounts. Email customerservices to have it released.
Booking A Print Insertion or Campaign
Whether it is the AM or Co-ord sending the booking request, the information needed to be included is:
- Client name with the MM Account number
- Publication (ie New Zealand Herald, Canvas, etc)
- Run Date
- Size (ie Full Page, ¼ Page Horizontal, etc)
- Cost
- If it is a Partner Programme client you need to let MM know
The booking request is emailed to the Media Manager team (Svc.CdmMManager@nzme.co.nz). When completed, the Media Manager team will send a confirmation email and booking details.
The Co-ordinator’s responsibility is to make sure that all print bookings have creative supplied to Media Manager, whether that is supplied by the client or briefed and created in-house.
Pulling an IO (Insertion Order)
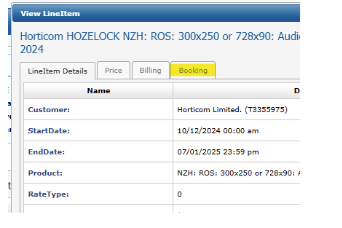
If you need to extract a booking confirmation from Media Manager, it’s called an IO (insertion order) but more specifically in Media Manager, it’s called a Proposal. You cannot pull these for individual insertions – rather, for the original elements of a whole booking. If changes are made since, they may not show up on later IOs/proposals.
To extract one, find the booking and click on the right arrow dropdown. There will either be an option called Proposal PDF, but if there isn’t, go to View and then at the bottom is a link called View Proposal.
Pulling a Print Missing List
1. In Media Manager, select Material > Print > Date range (todays’ date to whatever date you need) > SalesRep
- Co-ords use the missing list as a to-do list to plan out what needs to be chased up
- The Material column is an indicator that the material is expected to either be supplied (Camera Ready) or created in-house (Setting). However, don’t take it as bible – it may be booked Camera Ready but in discussion with the client they may ask for it to be created in house (Setting).
- The list is in no particular order and shows only insertions (not whole bookings) that have no material loaded against them. You should not be looking to upload revised material here.
- If you have submitted a brief through ATOL for an insertion, even if it’s not approved yet, it will disappear from this missing list. If you submit a brief in ATOL, make a calendar reminder to yourself to make sure it is approved in time for deadline.
- The Run Date refers to the date the publication’s issue, not the date it is due to go to the printer. For deadlines, refer to the Print Ratecard.
- Media Manager only shows missing material for print missings. Digital missings are found in the Digital Dashboard.
HOW TO UPLOAD SUPPLIED MATERIAL TO MEDIA MANAGER (CAMERA READY)
2. In Media Manager, find the insertion you want to upload material to. We can upload to one insertion at a time.
You can locate the insertion one of three ways:
a) pull a Missing Material list under Material (this only show insertions with no material loaded against it).
b) Use the Bookings tab to locate it by narrowing down the parameters (this view shows all insertions, whether they have material loaded against them or not)
c) Search for the client record in the search bar, and locate the insertion in the client’s Print Bookings list (this view will show all bookings, whether they have material loaded against them or not)3. When you’ve found the correct insertion, click on the (Upload button) to the right of the insertion’s line.
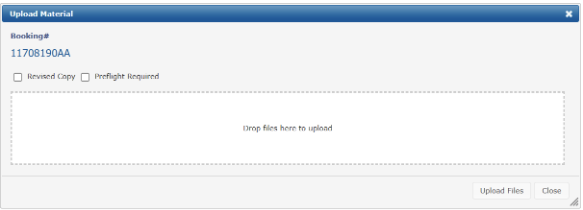
When done, the insertion’s Adprod status will change to COL-OK if it’s had no issue – if there is an issue, it will change to Resubmit.
- If you are revising material, you need to email the Media Manager Team with the booking number to load the creative to.
- If you wish to repeat material from a previous booking, don’t re-upload it – send an email to the Media Manager team and ask them to repeat it for you. Always be very clear and specific - refer to insertion numbers so there is no guesswork required of the Media Manager team.
- If you suspect the creative’s quality may not be to our specifications, or it arrives with crop marks or bleed – select the Preflight tick box when you Upload. This will send it to our Output team to check and test before they discover it during the printing process too late.
Always leave enough time for Preflight, especially in case it does need to be submitted; IE don’t tick preflight if uploading an hour before deadline.
Ad Archive
TEARSHEETS
A tearsheet is a copy of the print ad, displayed in the full editorial context as it was when published. It includes the publication details at the top of the page.
We can extract tearsheets as PDFs from Ad Archive after the ad has gone to print, for proof of placement when requested by the AM or client. Otherwise, if you need a quality PDF of a publication page, you can use SCC Pageview.
PULLING AN INSERTION’S TEARSHEET
1. Log into Ad Archive
2. Under Find An Ad, copy and paste the exact insertion number from Media Manager
3. In the left bar, select Ad Details>Placements
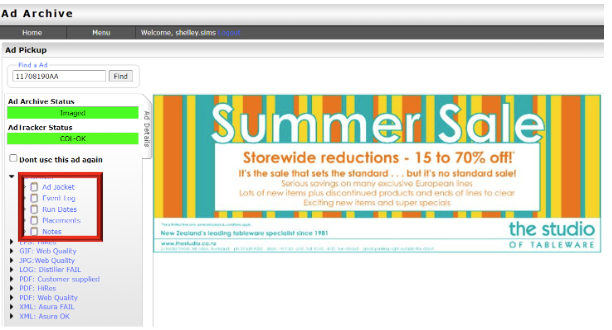
4. Select View Page in the search results
5. Underneath the image, select View Tearsheet (not Download PDF)
6. Download to PDF from this view by selecting the- You can rename the PDF to be more client-friendly or if you think this would be useful, like you are sending many tearsheets in one go and want to differentiate them easily. Ideally, keep the insertion number and add the client name and publication date after – IE 11708190AA_Studio of Tableware_220122
- The difference between Download PDF and View Tearsheet>Download is that simply downloading as it will not include the tearsheet information at the top.
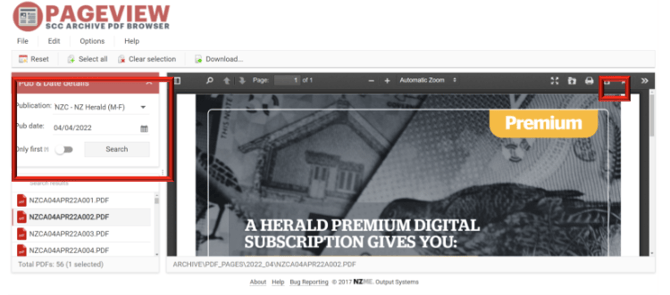
SCC Pageview
While a tearsheet is always the preferable way to show proof of placement, if you need to download just a decent-quality page of a publication regardless of what ads are on it, or Ad Archive isn’t available, use SCC Pageview. It can only show back 2 years from today’s date.
1. Open SCC Pageview in your browser
2. Enter the Publication and Run Date into the parameters and select Search.
3. From the search results, select the page you are after (runs sequentially, but page number is the last digital of the file name)
4. Select ![]() to download as PDF.
to download as PDF.
ViewMe / Paperview
ViewMe (also referred to as PaperView) is an internal browser viewer for print publications. While you can’t download a tearsheet or snip anything of reasonable quality, it’s handy if you need to flick through a print publication quickly to find something, if even then use it as a page reference to find something in Ad Archive or SCCPageview.
More just a note if you happen to find it handy, but it’s not very applicable to most situations. The most useful aspect is being able to take an image snip across a double-page spread.
ATOL (AdTracker Online)
ATOL is the system used to brief the Ad Support team for print or digital creative that needs to be made in-house for a client, known as a setting. The initial layout for print is free of charge to the client – but it becomes $15 per revision after that.
It’s important that if you are briefing through ATOL, you are leaving enough time for the creation, subsequent approvals and possible revisions. The Ad Support team require a minimum 2 working day turnaround, so be sure to factor this into your timings.
ATOL proofs are low res and can only be viewed in the proofing format with our logo etc – to avoid us creating artwork for other publications to use.
*Spec ads (ads made prior to a booking being placed, usually to demonstrate and ultimately pitch the product to the client) is possible, but Ad Support team are particular about this. If the spec ad is approved and a booking is subsequently made from it, you will need to ask them to transfer it over to the booking number.
HOW TO GUIDE:
file:///C:/Users/jessica.sterras/Downloads/ATOL%20August%20(1).pdf
*Add to watchlist so you don’t lose track and forget any.
For Digital bookings, to find the booking number you do the following, click on drop down next to line in MM

In the drop down, click View, then Booking
Then this is your booking number:
DIGITAL
NZME Digital products are numerous, ads run mainly on nzherald.co.nz, but also on OneRoof, NZME radio websites, BusinessDesk, social media on both Desktop and Mobile. Digital campaigns are booked in by the Account Manager via Media Manager.
To see some of our digital ad formats and specs click here: https://nzme.bonzai.co/showcase
To book a digital product we need:
- Client Name in MM
- Campaign name
- Start and end date
- Product e.g NZH MREC 300x250 and targeting if required
- Number of impressions or clicks
- CPM or CPC rate
- Total cost
Once this is booked an IO (booking confirmation) is sent to the AM and Coordinator.
If specs need to be sent to the client, you can find them here: Digital Specs - you need to scroll down the page
Digital missing’s can be found via the Digital Dashboard/NZME Digital Campaign Manager
Digital Dashboard
To pull a missing’s list you need to:
- Use the ‘Missing Creative’ tab
- Add the SalesRep
- Download the list as a spreadsheet by clicking the 3 dots on the top right > Export > CSV (Excel)
This list is what bookings do not have material loaded. You can now chase the Rep or client.
To load material to a booking you need:
- At least 1 image – to the correct specs
- URL – for the ad to click through to
- Booking number – IO # from Media Manager
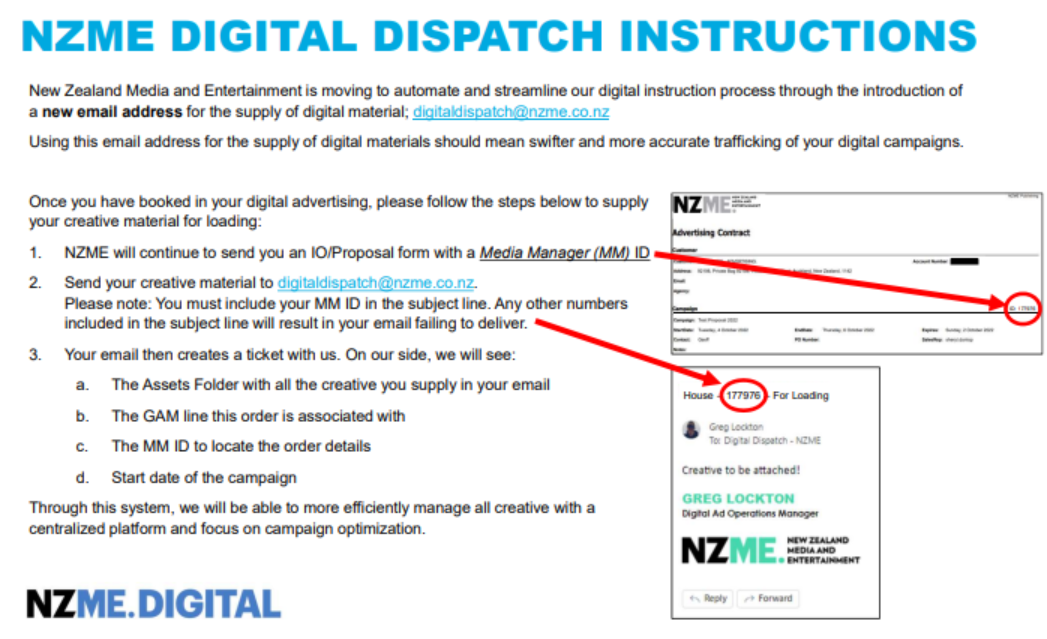
Once you have the above, send an email to digitaldispatch@nzme.co.nz with the URL, image and IO attached. Ensure the subject line includes: Client name – IO number – Material
Digital Toolboxes can be found below, this is where you can find all products:
Lifestyle and Entertainment Toolbox
Digital Reporting
- Impressions – how many people have scrolled past the ad (seen the ad)
- Clicks – how many people have clicked on the ad
Once a digital campaign is live it moves from the Missing Creatives tab
This will now show up on the other tabs, we keep an eye on how the campaign is performing. Some Account Managers ask for Interim reports, we can either send a screenshot to show the performance or download an Excel spreadsheet
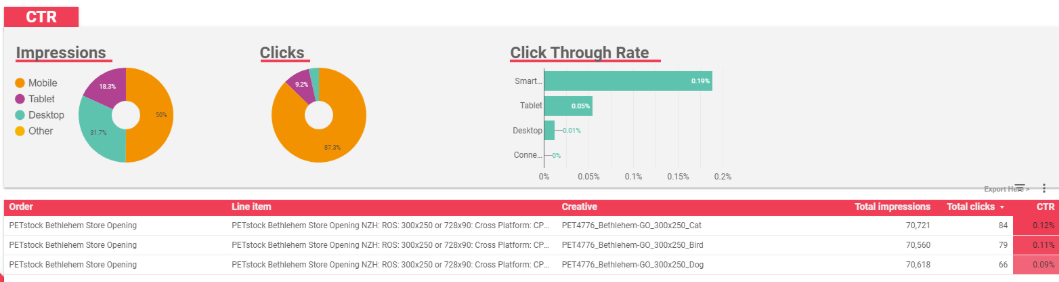
Delivery Status tab:
Fill in Advertiser (type in client name and then hover over name and click ONLY) click out of drop down and Order (type in Campaign name then hover over the name and click ONLY) click out of drop down, this will show how the campaign is tracking. The delivery indicator shows if the campaign will serve in full, shows impressions, clicks and CTR (click through rate).
You can screenshot as per below and send to AM:

Campaign Overview tab:
Fill in Advertiser (type in client name and then hover over name and click ONLY) click out of drop down and Order (type in Campaign name then hover over the name and click ONLY) click out of drop down, this will show how the campaign is tracking. The delivery indicator shows if the campaign will serve in full, shows impressions, clicks and CTR (click through rate).

Campaign Creative Breakdown:
Fill in Date Range > Advertiser > Order. This shows how each creative has performed across each line item and different creative loaded
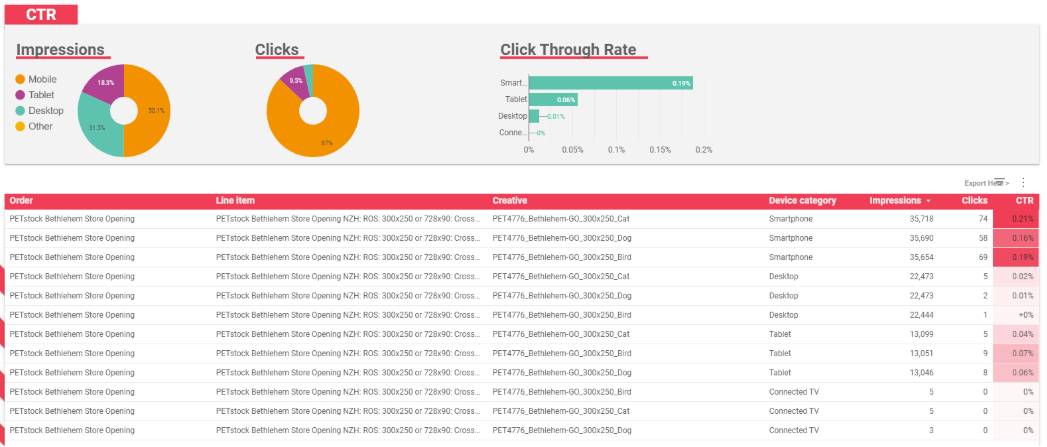
Campaign Device Breakdown:
Fill in Date Range > Advertiser > Order. This shows how each the campaign has performed across each different devices.
We can now download this information into an excel spreadsheet collate the information in a PowerPoint
Digital Reporting Beginners Guide:
GENERAL
Proforma Invoices
A proforma or manual invoice, is when our Customer Services team pull an invoice manually for a client, ahead of it’s automatic creation. This is usually so the client can pay ahead of time (for instance, they are not on a credited invoiced account) or just to pay at their convenience.
To get one of these, email customerservices@nzme.co.nz with the Booking reference; ie if it’s a Drive booking, it will be the Contract Number/s; if it’s Media Manager, the Booking number.
Partner Programme
The Process
Most of the Partner Programme process happens before it gets to us but we still need to understand how it works.
Whether it is the first time a client is signing a PP or they are resigning a new commitment, the process always begins with the AM and the client discussing how to structure their agreement.
There are a few types of PPs.
PP Client Journey: